
Learning Intentions
- Students will understand how optimising website load times improves user experience and search engine rankings.
- Students will apply strategies like caching, lazy loading, and image compression to enhance website performance.
- Students will evaluate how server location and response times affect website performance and use tools to reduce latency.
Syllabus Outcome
SE-12-06: Justifies the selection and use of tools and resources to design, develop, manage and evaluate software.
Lesson Activity
In this lesson, you’ll learn essential techniques for optimising web pages and applications, focusing on reducing load times. Reducing load times is a crucial factor in enhancing user experience and improving search engine rankings. Building on your knowledge of HTML, CSS, and JavaScript, you’ll explore methods such as image optimisation, code minification, and caching strategies. By understanding and applying these techniques, you’ll develop the skills to identify performance issues and implement effective solutions, ensuring that your web pages are fast, responsive, and meet the expectations of today’s users.
Understanding Load Times
In this section, you’ll explore the factors that affect how quickly web pages and applications load. Understanding load times is crucial for creating a smooth and efficient user experience. You’ll learn about elements such as network latency, server performance, and client-side factors like browser rendering and JavaScript execution. By grasping how these components interact, you’ll be better equipped to diagnose and address issues that can slow down a website, ensuring your pages load swiftly and keep users engaged.
Network Latency
Load times are affected by latency, which refers to the delay that occurs when data travels from a server to a user’s device. Imagine latency as the time it takes for a message to be sent and received between two distant locations. The further the data has to travel or the more congested the network, the longer it takes for a web page to load. High latency can cause noticeable delays, especially for users accessing websites from different parts of the world, leading to a slower and less responsive experience. Reducing latency, such as by using content delivery networks (CDNs) or optimising server locations, helps improve load times and ensures that web pages load quickly for all users.
To further optimise load times, it’s important to consider where the majority of your website’s visitors are located. If most of your users are in a specific country, hosting your site on a server closer to that location can significantly reduce latency. This proximity means data has less distance to travel, leading to faster load times and a smoother user experience. To visualise this concept, you can use tools like https://visualtraceroute.net/, which allows you to see the network “hops” your data makes as it travels from the server to your device. By observing these hops, you’ll better understand how server location impacts latency and overall site performance.
Using Open Visual Traceroute, you can see the visualisation of the path taken to reach this website from my location.
Give it a try yourself! You can download the app here.
Server Response Time
Server response time refers to the amount of time it takes for a server to respond to a browser’s request for a web page. It is typically measured in milliseconds (ms). It’s critical to consider how a slow server response time can significantly delay the overall load time of a web page, leading to a poor user experience and potential loss of visitors.
Factors Affecting Server Response Time
Server response time is influenced by several key factors. One of the most significant is server load—the number of requests a server is handling at any given moment. When a server is overloaded with requests, it may take longer to process each one, leading to slower response times. Another critical factor is the server’s hardware and software resources; a server with limited CPU power or memory will struggle to handle complex tasks efficiently.
Additionally, inefficient database queries can slow down response times, especially if the server has to retrieve large amounts of data or perform complex operations. The type of hosting environment also plays a role, such as dedicated servers and high-quality Virtual Private Servers (VPS) typically offer faster response times compared to shared hosting, where resources are distributed among multiple websites.
Measuring Server Response Time
Measuring server response time is essential for identifying performance bottlenecks and areas for improvement. Tools like Google PageSpeed Insights and GTmetrix can help you assess how quickly a server responds to requests. These tools provide metrics that indicate how long it takes for the server to begin sending data back to the browser after a request is made.
When using these tools, it’s important to establish a baseline response time for your website, which can then be compared against industry standards or competitors’ sites. By regularly measuring and monitoring server response times, you can ensure that your website remains responsive and efficient, providing a better experience for your users.
Optimisation Strategies for Reducing Server Response Time
To enhance website performance, it’s essential to implement a Content Delivery Network (CDN), which distributes your website’s content across multiple servers located closer to users. This approach not only lightens the load on your main server but also ensures faster delivery of content. Additionally, utilising server-side caching allows frequently accessed data to be stored temporarily, enabling quicker responses without the need for repeated processing. Both methods work together to significantly improve the user experience by reducing the time it takes for pages to load.
Database performance plays a key role in overall efficiency. By optimising database queries through indexing and streamlining complex operations, you can decrease the time it takes for your server to retrieve and process data. Writing clean, efficient backend code is also vital to ensure the server handles requests as swiftly as possible. Regular reviews of the code can uncover areas that need improvement. Finally, if the server struggles to cope with high traffic, upgrading to a more powerful server setup, such as a dedicated server or a higher-tier VPS, can provide the necessary CPU and memory for better response times.
Image Optimisation
Image optimisation is essential for improving website load times by reducing the size of images without sacrificing quality. By using compression techniques, selecting the right image formats, and implementing lazy loading, you can significantly decrease the time it takes for images to load, resulting in a faster, more responsive website.
Image Compression and Formats
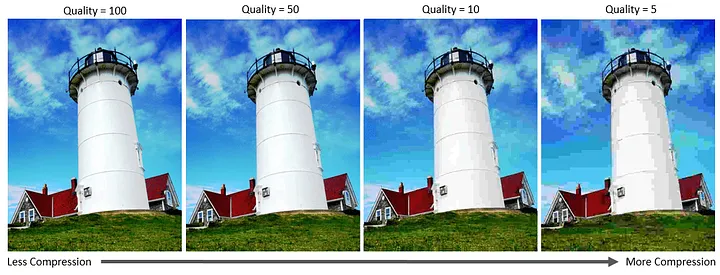
Images are often the largest files on a webpage, making them a prime target for optimisation. Image compression involves reducing the file size of images while maintaining acceptable quality. There are two types of compression: lossy and lossless.
- Lossy compression reduces file size by removing some image data, which may slightly reduce quality, but the difference is often unnoticeable to users.
- Lossless compression reduces file size without losing any quality, though the file size reduction is generally smaller compared to lossy compression.
Choosing the right image format is also crucial. For photographs, JPEG is typically the best choice due to its balance of quality and compression. For graphics or images with transparency, PNG is preferred, though it results in larger files. WebP is a newer format that offers excellent compression for both photos and graphics with transparency, often outperforming both JPEG and PNG in terms of file size and quality.
To make this concept more engaging, consider this: by optimising images on a webpage, you can drastically cut download times, leading to a smoother experience for users, especially those on slower networks. For example, an image that starts as a 5MB JPEG might be compressed down to just 500KB with minimal loss of quality.
Source: Everything You Need to Know About Image Formats In 2024 | WDD
Lazy Loading
Lazy loading is a technique that defers the loading of images until they are needed, typically when they appear in the user’s viewport. This approach drastically reduces the initial load time of a webpage, as only the images that are immediately visible are loaded. The remaining images load as the user scrolls down the page, providing a more efficient and faster user experience.
To see how this works in practice, here’s a simple example of lazy loading using HTML and JavaScript:
<img src="placeholder.jpg" data-src="high-quality-image.jpg" alt="Lazy Loaded Image" class="lazyload">document.addEventListener("DOMContentLoaded", function() {
let lazyImages = [].slice.call(document.querySelectorAll("img.lazyload"));
if ("IntersectionObserver" in window) {
let lazyImageObserver = new IntersectionObserver(function(entries, observer) {
entries.forEach(function(entry) {
if (entry.isIntersecting) {
let lazyImage = entry.target;
lazyImage.src = lazyImage.dataset.src;
lazyImage.classList.remove("lazyload");
lazyImageObserver.unobserve(lazyImage);
}
});
});
lazyImages.forEach(function(lazyImage) {
lazyImageObserver.observe(lazyImage);
});
} else {
// Fallback for browsers that don't support IntersectionObserver
lazyImages.forEach(function(image) {
image.src = image.dataset.src;
});
}
});
In this example, the img tag initially loads a small placeholder image. When the actual image enters the viewport, the JavaScript code swaps the placeholder with the high-quality image. This not only improves the page load speed but also ensures that users only download the images they actually view, saving spare capacity and improving performance.
For an even simpler implementation, modern browsers now support the loading="lazy" attribute, which allows you to enable lazy loading directly in the HTML without needing JavaScript:
<img src="high-quality-image.jpg" alt="Lazy Loaded Image" loading="lazy">By adding loading="lazy" to the img tag, the browser automatically delays loading the image until it is about to appear in the viewport. This method is easy to implement and works across most modern browsers, providing an effortless way to enhance page performance.
Using either the JavaScript approach or the loading="lazy" attribute, you can ensure that your web pages are optimised for speed, delivering images only when users need them, thus improving overall performance and user experience.
Source: Browser-level image lazy loading for the web | Articles | web.dev
Source: Three Types of Lazy Loading in JavaScript with example | by Muhammad Fauzan | Medium
Code Minification
Code minification is a crucial technique in web optimisation that involves reducing the size of your website’s code files—such as CSS and JavaScript—by removing unnecessary characters like spaces, comments, and line breaks. This process helps to decrease the file size, which in turn reduces the time it takes for a browser to download, parse, and execute the code. By minifying your code, you can significantly improve your website’s load times, leading to a faster and more responsive user experience.
CSS and JavaScript Minification
Minifying CSS and JavaScript files is a simple yet powerful way to improve website performance. It involves removing unnecessary characters, such as spaces, comments, and line breaks, from the code. This reduces file size, allowing the browser to download and execute the code more quickly.
For CSS, minification can also involve merging files and compressing the code into a single, compact line, reducing both file size and the number of HTTP requests. JavaScript minification follows a similar process, often including the removal of unused code and shortening variable names.
Tools like UglifyJS for JavaScript and CSSNano for CSS automate this process, making it easy to integrate minification into your development workflow. Here’s a quick really basic example:
Before Minification:
body {
    font-family: Arial, sans-serif;
    background-color: #f4f4f4;
    margin: 0;
    padding: 0;
}
After Minification:
body{font-family:Arial,sans-serif;background-color:#f4f4f4;margin:0;padding:0}This smaller, more efficient code helps your website load faster, enhancing the overall user experience.
Source: How to minify CSS for better website performance | Cloudflare
Caching Strategies
Caching is one of the most effective ways to improve website performance by storing reusable resources for faster access. There are two main types of caching strategies: browser caching and server-side caching. Browser caching allows the user’s browser to store static resources, such as images, CSS, and JavaScript files, so they don’t need to be downloaded again on subsequent visits.
By setting cache headers in your HTTP response, you can specify how long these resources should be stored. For example, you can use the following code in HTML to instruct the browser to cache CSS files for 30 days:
<head>
    <meta http-equiv="Cache-Control" content="max-age=2592000">
</head>
Source: Meta Cache Control HTML5
Server-side caching involves storing dynamic content on the server, reducing the need to repeatedly fetch data from databases or execute resource-intensive processes. This can be implemented using caching libraries in Python, where you can store frequently accessed data in memory for faster retrieval. Combining server-side caching with a Content Delivery Network (CDN)—a network of servers distributed globally—ensures that static content like images and scripts are served from the closest possible location to the user, further improving load times.
Here’s a simple Python example using the functools module to cache server-side data:
from functools import lru_cache

@lru_cache(maxsize=100)
def get_data_from_db():
    # Simulated database call
    return "Data fetched from the database"
In this example, the lru_cache decorator caches the database result, so if the same data is requested multiple times, it will be retrieved from memory rather than querying the database, saving time and resources. Together, browser caching, server-side caching, and CDNs form a powerful strategy to optimise website performance by reducing both load times and server strain.
Reducing HTTP Requests
Reducing the number of HTTP requests made by a webpage is a key strategy for improving load times. Every asset, like CSS, JavaScript, and images, requires a separate HTTP request to the server, which can slow down the page loading process. Two effective ways to reduce these requests are combining files and using sprites.
Combining files involves merging multiple CSS or JavaScript files into one, reducing the number of separate requests the browser has to make. For example, instead of loading three different CSS files, you can merge them into a single file:
Before:
<link rel="stylesheet" href="styles1.css">
<link rel="stylesheet" href="styles2.css">
<link rel="stylesheet" href="styles3.css">
After:
<link rel="stylesheet" href="combined-styles.css">By combining files, the browser only needs to make one request, leading to faster load times, especially on pages with many styles or scripts.
Source: How to Reduce Your Website’s HTTP Requests
Using sprites is another method for reducing HTTP requests for images. A sprite is a single image file that contains multiple smaller images, such as icons. Instead of loading each icon as a separate image, you load the sprite file once and then use CSS to display the individual parts of the sprite. Here’s an example:
#home {
  width: 46px;
  height: 44px;
  background: url(img_navsprites.gif) 0 0;
}
In this example, a single image file (sprite.png) contains multiple icons. By using background-position in CSS, you can display specific sections of the sprite, reducing the number of separate image requests. This approach is particularly useful when you have many small images, like icons or buttons, and can greatly improve load times by minimising the number of HTTP requests made to the server.
Source: Make fewer HTTP requests: What this means and how to do it · Raygun Blog